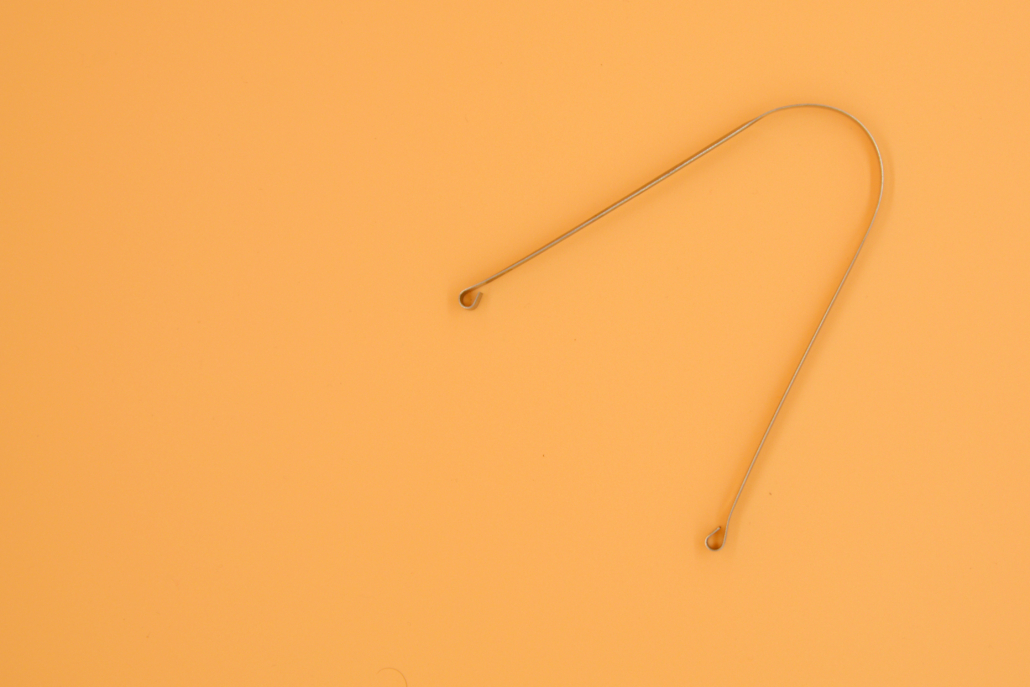
The Ancient and Modern Practice of Tongue Scraping: Boost Your Oral Health and Wellness
Introduction to Tongue Scraping
Tongue scraping, a simple yet effective oral hygiene technique, involves the removal of bacteria, toxins, and food debris accumulated on the tongue overnight. Utilizing a metal or plastic scraper (traditionally copper), this practice not only promotes a clean mouth but also enhances overall health.
Historical Roots
Rooted in ancient wisdom, tongue scraping is a traditional practice in Ayurveda and has been used for centuries across various cultures including Europe, Africa, Arabia, South America, and particularly India. Historically, scrapers were crafted from a range of materials like wood, copper, silver, ivory, mother-of-pearl, whalebone, celluloid, and tortoiseshell, reflecting the practice’s integration into daily life and its importance in maintaining oral cleanliness.

Choosing the Right Product: Copper Tongue Scraper
A copper tongue scraper is recommended due to its natural antibacterial properties. Copper not only effectively removes oral debris but also helps in reducing the microbial load on the tongue, which is vital for maintaining oral hygiene.
Health Benefits of Tongue Scraping
- Enhances Taste: Regular scraping can enhance your taste perception by clearing out taste-dulling debris.
- Reduces Bad Breath: It removes bacteria that contribute to halitosis.
- Prevents Oral Health Issues: By maintaining a cleaner tongue, you reduce the risk of cavities, gum diseases, and infections.
- Detoxification: In Ayurveda, removing ‘ama’ (toxic residue) from the tongue is considered crucial for overall detoxification of the body.
Appropriate Conditions for Tongue Scraping
Ideal for individuals experiencing:
- Bad breath
- A coated tongue
- Loss of taste
- A desire for a more holistic approach to oral hygiene
Potential Risks and How to Avoid Them
- Gag Reflex: To prevent gagging, avoid placing the scraper too far back initially. Start in the middle and gradually move backward.
- Cutting the Tongue: Use gentle pressure and ensure the scraper is smooth with no sharp edges.

How to Scrape Your Tongue: A Step-by-Step Guide
- Stand in front of a mirror, open your mouth wide, and stick out your tongue.
- Place the scraper at the back of your tongue (or as far as comfortable).
- Gently pull the scraper to the tip of the tongue, removing the coating.
- Rinse the scraper and repeat if necessary.
Frequency of Tongue Scraping
For best results, incorporate tongue scraping into your morning routine, ideally before eating or drinking anything.
Cleaning and Caring for Your Tongue Scraper
After each use, wash the scraper with warm, soapy water. Store it in a clean, dry place to prevent bacterial growth.
Supporting Research and References
- Oral hygiene: a history of tongue scraping and brushing
- The effect of tongue scraper on mutans streptococci and lactobacilli in patients with caries and periodontal disease
- Healthline: Tongue Scraping
- Ayurveda: Tongue and Corresponding Organ Locations
- Impact of tongue cleansers on microbial load and taste
By integrating this ancient practice into your modern lifestyle, you can enhance not only your oral health but also contribute to your overall well-being. Tongue scraping is a testament to how traditional health practices can be seamlessly adopted to support our contemporary health needs, aligning perfectly with holistic health approaches like those offered in our “Radiant Life Training” program.
Disclaimer: The information in this blog post is provided for general informational purposes only and is not intended as medical advice. For personalized advice or treatment, please register as a patient at Radiance Healthcare, or consult with a qualified healthcare provider for any medical concerns.

The Revitalizing Practice of Oil Pulling: Ancient Wisdom for Modern Health
What is Oil Pulling?
Oil pulling, a traditional Ayurvedic remedy, involves swishing oil in the mouth to enhance oral hygiene and overall health. This simple yet effective practice not only cleans the oral cavity but also offers systemic health benefits by detoxifying the body.
Historical Significance of Oil Pulling
Traced back to the ancient Ayurvedic texts, the Charak Samhita and Sushruta Samhita, oil pulling is referred to as ‘Kavala Graha’ or ‘Kavala Gandoosha’. This time-honored method has been used for thousands of years in India, underscoring its enduring belief in promoting health and well-being.

Optimal Oils for Pulling
The best oils for pulling are cold-pressed and include:
- Sesame oil
- Coconut oil
- Sunflower oil
- Olive oil
These oils are chosen for their ability to bind to oral impurities and their intrinsic health properties, ranging from antibacterial to anti-inflammatory effects.
Profound Benefits of Oil Pulling
- Detoxification: Oil pulling is believed to cleanse the entire body by removing toxins and harmful bacteria.
- Oral Health: Regular pulling reduces plaque, prevents oral diseases like gingivitis, cavities, and periodontitis, and leads to healthier gums and whiter teeth.
- Systemic Health: Beyond oral care, it is said to improve longevity, metabolism, and reduce systemic diseases.
- Wellness: Engaging in this practice can stimulate mental clarity and energize the senses.
Addressable Conditions
Ayurveda champions oil pulling as a cure for over 30 systemic diseases, including:
- Dental issues like cavities and gingivitis
- Bad breath and tooth pain
- Systemic issues such as anorexia, chapped lips, dry skin, and even impaired vision
Safety and Risks
While generally safe, oil pulling should be avoided in children under 5 to prevent aspiration. Adults should ensure not to swallow the oil to avoid ingesting the toxins it has pulled from the body.
Step-by-Step Guide to Oil Pulling
- Prepare: Measure 1 tablespoon of oil (1 teaspoon for children over 5).
- Swish: Gently swish the oil in your mouth on an empty stomach for 10 – 20 minutes.
- Dispose: Spit the oil into a trash can to avoid plumbing issues.
- Rinse: Clean your mouth with water and proceed with normal tooth brushing.
Frequency of Practice
For optimal results, oil pulling can be performed up to three times daily, preferably before meals to maximize its detoxifying effects.
Cleaning and Care
It’s essential to use fresh oil for each session and maintain cleanliness to prevent bacterial growth associated with the oil.
Learn More and References
- ScienceDirect: Oil pulling for maintaining oral hygiene – A review
- Healthline: 6 Benefits of Oil Pulling — Plus How to Do It
- PubMed: Oil pulling for maintaining oral hygiene – A review
By embracing oil pulling as part of your daily routine, you engage in a practice rich in tradition and supported by both ancient wisdom and modern science. This aligns seamlessly with our holistic approach at “Radiant Life Training,” where we integrate ancient practices to promote contemporary health and well-being.
Disclaimer: The information in this blog post is provided for general informational purposes only and is not intended as medical advice. For personalized advice or treatment, please register as a patient at Radiance Healthcare, or consult with a qualified healthcare provider for any medical concerns.

Nasal Irrigation: A Guide to Neti
Introduction to Neti
Neti is a traditional nasal irrigation technique that uses a saline solution to cleanse the nasal passages. It is a practice rooted in Ayurveda, an ancient Indian system of medicine that emphasizes wellness informed by and in balance with nature. By gently flushing the sinuses, neti can alleviate various nasal conditions and improve respiratory health.
Historical Roots
The practice of neti has been a cornerstone of Ayurvedic medicine for centuries, designed to enhance breathing and support the natural cleansing processes of the respiratory system. It is often used as a preventative measure to maintain nasal health and as a therapeutic intervention for respiratory ailments.
Essential Neti Products
To perform neti safely and effectively, a few products are essential:
- Neti Pot: A small, specially designed pot used for nasal irrigation.
- Saline Salt Packs: These are pre-measured and mixed to ensure the correct isotonicity.
- Distilled Water: Ensures that the irrigation solution is free from contaminants.
- Tissues: For gently drying the nose after irrigation.
Benefits of Nasal Irrigation
Practicing neti can offer numerous health benefits:
- Cleanses the Nasal Passages: Removes dust, pollen, and other allergens.
- Reduces Mucus Buildup: Helps clear out blocked nasal passages.
- Decreases Inflammatory Agents: Reduces the presence of elements that cause nasal and sinus inflammation.
- Enhances Natural Cleaning: Improves the nasal cavities’ self-cleaning capabilities.
- Restores Breathing Ease: Opens the nasal passages to ease breathing.
- Moisturizes: Helps maintain moisture in the nasal cavities.
- Reduces Medication Dependence: Frequent users may find a reduced need for nasal sprays and other medications.
Appropriate Conditions for Neti Use
Neti is particularly beneficial for:
- Sinus Congestion and Infections
- Allergic Rhinitis
- Common Colds
- Post-Nasal Drip
- Recovery from Nasal Surgery
- Chronic Rhinosinusitis
Potential Risks and Precautions
While neti is generally safe, it is crucial to follow proper guidelines to avoid risks:
- Avoid in Infants/Small Children: Their nasal passages are too delicate for this practice.
- Sterile Water is Mandatory: Use only distilled, sterile, or previously boiled water to prevent infections.
- Watch for Protective Mucus Removal: Excessive use might strip away protective mucus.
- Contraindications: Avoid neti if you have ear infections, blocked ears, recent facial trauma or sinus surgery.

Step-by-Step Neti Guide
- Preparation: Wash your hands thoroughly. Mix the saline solution in a clean neti pot with lukewarm, sterile water.
- Irrigation: Lean over a sink, tilt your head to one side, and gently insert the neti pot’s spout into the upper nostril. Allow the solution to flow through and exit the opposite nostril. Use about half the solution.
- Completion: Gently blow your nose without complete closure to avoid pressure on the eardrums. Repeat the process on the other nostril. Discard any remaining solution and clean the neti pot.
Safety Guidelines
- Water Quality: Never use untreated tap water. Boil tap water for at least five minutes if distilled water isn’t available.
- Personal Use: Do not share your neti pot to prevent cross-contamination.
- Regular Cleaning: Follow a strict cleaning regimen for your neti pot. For copper or ceramic pots, boil for 10 minutes every three months; or for plastic nasal irrigation devices, replace every 3 months.
- Saline Solution: Use only isotonic or hypertonic saline solutions that are pH-balanced and preservative-free. Avoid homemade salts due to potential impurities.
Recommended Frequency
Consult with a healthcare provider for personalized advice, but generally, once daily is beneficial, particularly during allergy seasons or after exposure to irritants.
Further Reading and References
- Saline Nasal Irrigation for Upper Respiratory Conditions – American Family Physician
- Effective Neti Pot Usage – Healthline
- Nasal Irrigation Guidelines – NeilMed
Conclusion
Neti is a valuable addition to anyone’s health regimen, particularly for those struggling with nasal and respiratory issues. By incorporating this ancient practice into your daily routine, you can enjoy the profound benefits of clearer breathing and improved nasal health. Always ensure to follow the safety guidelines to maximize benefits and minimize risks.
Disclaimer: The information in this blog post is provided for general informational purposes only and is not intended as medical advice. For personalized advice or treatment, please register as a patient at Radiance Healthcare, or consult with a qualified healthcare provider for any medical concerns.

